Background
Tuesday, June 28, 2016
A Great Day's Worth of Crafting
I unashamedly lifted Brandy's design using her IO Hollyhocks dies. I first die cut the hollyhocks from Bristol paper and then used my Mission Gold watercolors to paint the individual die cuts. What happened is this lovely bloom look. I then die cut grass using my IO small grass dies and repeated the watercoloring. The background washes were colored and then die cut using my stitched rectangles dies.
This last card I used a bluebells die that I won from Loly over at Card Ville. The technique worked well with this die too. I've made quite a few of these cards as a set and plan to give them away. I was so pleased with how these turned out, don't be surprised if I repeat this technique soon!
Saturday, June 25, 2016
Rubbernecker Stamps Cards
I picked up some new to me Rubbernecker stamps online so I decided to make a set of cards. These were created using my Prima Oil Pastels. I simply used the oil pastel to color the solid version of the Poppy Duo stamp and a waterbrush to blot water and activate the color. The outline is stamped in black Archival Ink and embossed with clear embossing powder.
I really love how the Rubbernecker stamps work. They are easy to use to create a beautiful finish. If you haven't tried them, I'd highly recommend them.
I've decided to link up to these challenges:
City Crafter Challenge Blog White and Bright
Word Art Wednesday's Challenge Weeks #236-237- Anything Goes
Come join the fun.
Friday, June 24, 2016
One Last Father's Day Card
I'm stopping in to share this last Father's Day card. It's a simple design and a bit of a lift from a Pinterest pin. Still, I like the design and made a few elements my own, so I was pleased with how this turned out.
I hope your celebrations were enjoyable. I'm keeping up the crafty ways despite our intense heat of summer has begun.
Wednesday, June 22, 2016
Making Christmas Cards
My cardmaking reputation caught up with me this year as my aunt requested handmade Christmas cards. I was more than pleased to comply. It gives me the opportuntity to create and give stuff away. In this case, I made 75 of these bad boys - a copy of my Christmas card last year in red. I'm pleased with how these turned out and hope that my aunt will enjoy sending them out.
I had fun getting these done at the CK Scrapbook convention with Brandy earlier this year. I will try to deliver them next month with an in person visit. We'll see how that works out for me :)
Have you started the Christmas card making yet? I've seen some of my regular blog friends with just a few. That's a good tactic to be ready in time. I actually completed my major card assembly at the same time, but will hold onto that one until Christmas time as a surprise. That's how I usually do it, get a bit ahead because crafting at Christmas time can feel stressful.
Hoping this little Christmas in June post inspires you.
Monday, June 20, 2016
Watercolor Washes and White Embossed Images
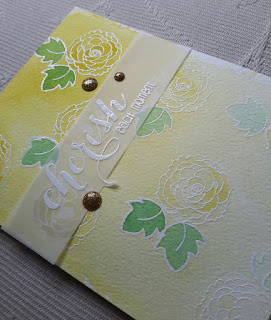
No secret, I'm enjoying watercoloring. It is such a simple tool and the results are fabulous. For this card, I used this post as inspiration. I decided to make multiples as i wanted to try different colors and intensity of color. I followed the same technique - wet on wet watercoloring using my Mission Gold watercolors.
I super love how these cards turned out. They were easy enough to make and fun to play with watercoloring.
I played a bit with coloring the leaves. I found I didn't like this look nearly as well as I enjoyed the other card fronts. It's a nice enough card, just like the monochromatic look of the others a bit better.
What card sets have you been making? If you've never considered making multiples, let me encourage you. Because all of the supplies were out and available, this set of 5 cards only took a couple of hours with drying time and assembly. Go ahead, give it a try!
Saturday, June 18, 2016
Another Father's Day Card
I promised this post today. A paper piecing card with an image from the Silhouette store for Father's Day. I was totally inspired by Eleven from the Dr. Who series. Those that know Who know exactly what I'm refering to. I'm missing the suspenders (they are tucked under the jacket, you just can't see them). Oh well, I'm not sure my grandfather will get the reference, but I showed this card to my kids and they got it.
All pieces are edged with Vintage Photo and the sentiment is white embossed to create a bit of contrast. I'm super touched with how well this turned out and hope that it sends just the right message to my dear grandfather - we love you and are grateful to you for all the support and fathering through the years.
What have you planned for tomorrow? We'll have breakfast with the kids and then plan to drive to California where I have business during the week. I'm hoping to keep up with all the business committments, that might be a bit tough.
Have a fantastic rest of your weekend.
Friday, June 17, 2016
Happy Father's Day Card
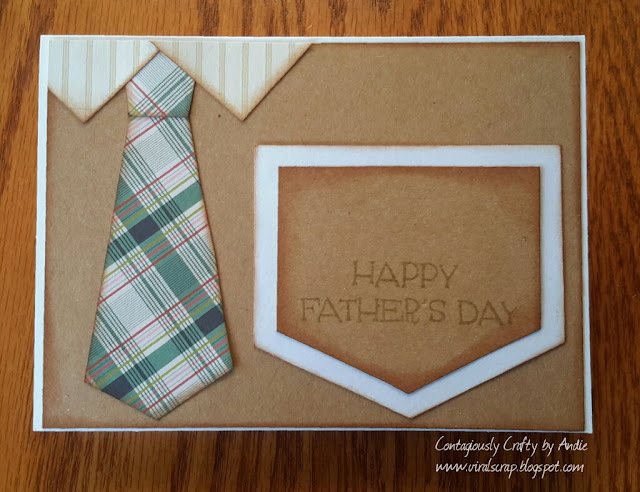
I needed a couple of Father's Day card. I decided to do a bit of paper piecing. This card was made using a card on the Internet as inspiration. I lost the url or I would have shared it.
I made scrap paper templates for each of these elements, just eyeballing the dimensions. The point is that the pocket will hold a gift card - a simple gift, but perfectly appropriate for a dad to pick out exactly what he wants.
I super love how they turned out so I decided to get out the Silhouette to give another simple, but effective card design a go.
I'll be back tomorrow to share this second card. I hope you are ready for the big day - there's only a few more left before we get to celebrate the dads in our lives.
Thursday, June 16, 2016
A Simple Masculine Card
Forgive this photo. I forgot to take a photo of this card made for a coworker. This photo is taken in the dim lighting of my office. Still, it was such a simple, but effective card that I wanted to share. The striped patterned paper is from the stash. I wrapped twine around and stamped the simple sentiment in black Archival Ink. The gentleman coworker was pleased for the small sentiment.
Today is my husband's birthday. Dan's an amazing partner and I feel so blessed to have him. But I have to keep his card secret. I'll share in a few days what I made special for him.

Wednesday, June 15, 2016
A Simple Wedding Anniversary Card
Just a quick post to show this finished card. I had previously watercolored the heart as a class assignment for my Online Card Classes Watercolor for Cardmakers. I added the hand drawn border and a couple of sequins to make this a simple anniversary card. A co-worker used this and I let her pick her sentiment for the inside. Simple and to the point.
So I've struggled if or how to say something about the tragic events in Orlando. This blog is focused on spreading joy through crafting. I don't enter into most current events. However, it's not lost on me that I had an organic response to the tragedy in Paris in this very same blog. I think the difference is that this happened closer to home - hundreds of miles away, but in our country and to our people. It reminds me we aren't any safer here. It reminds me that our response to violence and destruction should be love. Sending prayers and love to those hurt and healing and those who lost loved ones in the tragedy in Orlando.

Tuesday, June 14, 2016
A Sweet Treat for the Sweathearts at Work
I made these treat bags for the ladies at work. The tag was cut using my paper trimmer and watercolored to create an appropriate background for these Delicate Asters. A simple sentiment to encourage and this tag was stapled to the bag which contained a scones mix and small jar of jam/jellies. Just a little treat to make them smile.
Spreading cheer through crafting - I'm not sure who enjoyed this more - me as I made the tags or them as they ate thier scones!
Monday, June 13, 2016
Getting Kits Used
I have been looking through the stash and finding long hidden kits that should have been used by now. This set of cards is one such kit. The kit was probably handed out at one of the CK Scrapbook convention crops more than a decade ago. Or some such story which I've long forgotten. However, the simple design makes these cards just as nice today as the day they were assembled into the kit. So, I decided to put them together.
The kit did not have instructions or pictures of the finished project - probably one reason these weren't put together back in the when. I decided to use my own vision (and little hints in the project supplies that made deciding easier) and just get these notecards together so I could use them.
What has been sitting in your stash unused? I highly recommend getting it out and getting it used. There's no point in letting it go to waste. These cards are nice enough, if not exactly my current style and techniques. Go, get that stash reduced. I'm sure there are more new techniques and tools to add back in!
Subscribe to:
Posts (Atom)


