Background

Thursday, May 31, 2012

Kindergarten Graduation Card


My nephew graduated from kindergarten this week.  I made this card using the Cricut Wild Card cart.  It is very simple, but Jake is 5 (almost 6), so a card in his school colors makes a splash.  Yeah, Jake!  Good Job!

Auntie Andie

Tuesday, May 29, 2012

Softball- it's almost over


This is just a preview of fun to come this week.  My daughter, Katie, finished her spring recreation softball season this past week.  We always have a ton of fun and I've let you in on a preview of the celebratory action.  I used my Scor-Pal to score some thin purple cardstock (1 1/2 in x 12 in piece) every 1/4 in. and fan folded the pieces.   I snipped off one end of each fold to mate the two ends perfectly together.  I used Scrappy Tape to adhere the two edges creating the rosette.  I sealed the rosette in place by using a glue gun and a 1 1/2 in. circle cut from my Cricut.

The pictures were easy to make.  I imported the picture into Word.

 I selected the image by clicking on the image which creates the box with circles at the corners you see on the left.  The I selected the Picture Style indicated on the Picture Tools ribbon.  Selecting this Picture Style will display the picture image identified in the image on the left.

After this, we need to size the picture appropriately.  Again, using the Picture Ribbon I modified the height to the size I wanted for my rosettes.  In this case, I cropped to 2.2 in. or slightly smaller than 2 1/4 in. circle.  This leaves an oval image.  We're not done yet. 


I then used the Crop option (shown in the image above) to create a circular crop (rather than the oval previously shown).  To do this, click the Crop button on the Picture Tool ribbon.  This displays black crop corners as seen in the image to the right.  I pull each corner in until the circle surrounds the portion of the image I want to highlight.  You can also move the mouse around in the picture area until the four arrows are displayed.  At this point, the image can be moved behind the crop to adjust positioning.  Play with it until you get what you want.  I made 33 different pictures for use on these cupcake toppers.  I printed the images on 8 1/2 x 11 photo printing paper and cut out the images at 2 1/4 in. circle on my Cricut using the centerpoint cutting option.  You can see that they aren't all symmetrical (there is more white in the upper right quadrant of the image I've cropped).  However, I bet you didn't immediately notice this.  Everyone is so happy to see their face on a cupcake (or their daughter's face) they don't notice.

I've made a few more goodies for the girls.  I'll post them once the party has been enjoyed.  That's enough secrets released for now.  More to come...

Updated:  I posted this project on The Paper Variety's Anything But a Card or Layout challenge.  This is certainly not a card or a layout.  It sure is fun to see all the projects being entered.  Check them out!

Andie


Sunday, May 27, 2012

3-D Cards Using Heartfelt Creations and Copic Markers

Brandy made these lovely cards using her Heartfelt Creations products, Copic Markers, and Distress Inks. Since I can't seem to carve out time for her to post (if I get scrappin' time with her, I'm happy!), I thought I would share her product with you.

These beautiful cards were made using the Heartfelt Creations stamps that coordinate with the Spellbinders (and other Heartfelt Creations) flower dies.  The flowers were stamped and die cut, then colored using Copic Markers and the blending solution.  The card background was stamped using the cluster stamps from Heartfelt Creations and then colored with the Copic Markers as well.  You can see corner punches were used to create decorative corners.  These card bases were then enhanced with Distress Inks using the Blending Tool.  The flowers were shaped and strategically adhered to the card bases.  The effect was very beautiful and certainly worth the time and effort spent creating these lovely works of art!  I believe Brandy used these cards for Mother's Day cards and still has a couple left over for some future purposes.  What a wonderful result!

Brandy (through Andie)


Monday, May 21, 2012

Melissa Frances Card Class

In a recent post, I mentioned a wonderful card class taught by Melissa Frances that Brandy and I attended at the Mesa, AZ CK Scrapbook Convention.  We really loved the cards, papers and the fact that we came away with extras.

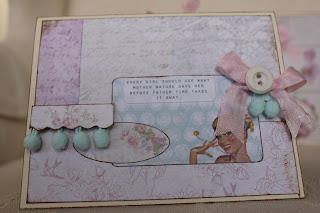
The cards featured these old-timey photos of ladies in their undergarments. Melissa Frances has publicly supported breast cancer causes due to her own previous health concerns. These cards were made using the C'est La Vie Retro Stickers. The card designs were simple layers embellished with Vintage Photo Distress Ink and vintage seam binding ribbons.  The aqua pom pom trim added a really cute effect.  The class was fast paced- we made five cards in 60 minutes including the inking, making bows, and paper layering.  Both Brandy and I were able to keep up and walked away with 5 cards ready for use.

 Oh yeah, I won one of the class door prizes.  They ended up being these lovely banner stickers.  This, of course, prompted a trip to their booth and a *small* purchase of some matching papers and fun tissue paper garland.  I promptly put these supplies to work and made the following cards:

These beautiful papers and embellishments create the sweetest note cards.  I've always  loved Melissa Frances designs and after my nephew's first year scrapbook, her products will always have a special place in my heart.  I'm not sure to what good use I will put each of these, but they are waiting for a purpose.


Andie

Thursday, May 10, 2012

The Original ScrapBox

In a recent post regarding the CK scrapbook convention, I mentioned my Original ScrapBox.  When Brandy wrote our very first post (could it really have been in October of 2010?), she mentioned my Original ScrapBox.  That first tease should have spurred me on to quickly post about this wonderful organizational tool.  However, somehow I made it to almost two years later without even mentioning my wonderful box. 

I live in a cozy 1600 sq. ft. house.  It was lovely when we purchased it 19 years ago.   The layout is perfect for me- second story, separate dinette where the dogs spend most of their time, high ceiling in the living room making it look bigger than it really is.  The coziness of my home is comforting.  The lack of storage space is not.  For years, my crafting supplies were crammed into every spare nook and cranny.  When I started looking at storage solutions, there weren't many that could help.  My only spare space was in what should be my dinning room- one third of the living room space which has high ceilings, but is a narrow space.  It also meant that my craft storage would be seen from the front door by anyone who walked into my house and by anyone who I had the great fortune of entertaining.

You might agree with me that most craft storage would not work. Nothing plastic (ughhh!), or colorful or even utilitarian no matter how useful was going to "fit" into my space. I really struggled for several months. Money was extremely tight and I just kept at it, saving my pennies and hoping for an inspiration. That inspiration came at the 2010 CK Scrapbook convention in the form of an energetic gentleman at the Original ScrapBox booth. He showed me the big WorkBox with two doors full of space and when I explained my tight situation he mentioned that he even had a MiniBox. All of these different storage solutions had lovely wood doors that shut away the mess. I left the booth with stars in my eyes imaging all the nooks and crannies my craft supplies would come pouring out of should a ScrapBox arrive at my house.


I was so serious that I had my hubby come to the convention the next day and see for himself.  He agreed that this was just the right combination of style and storage.  He even agreed (see- he notices more than I think) that the MiniBox was just too small and that we should target the full size WorkBox.  Thus began my penny saving in earnest.  It took me several months, practically no trips out for dinner and certainly no new clothes, but later in the year I was the proud owner of a cherry wood veneer WorkBox.

To say I love my ScrapBox- that is an understatement.  To say it is the perfect storage solution for me- that is even more of an understatement.  Everything about this system is perfect for me.  I no longer have craft storage anywhere else. 


All my sewing supplies are inside this box. All my supplies for kids crafts are inside this box.  All the supplies that I use to create stuff for Sunday school are in this box.  No more hiding places.  Another great thing about my ScrapBox is that I know where stuff is.  There are labeling places on each bin.  I haven't got around to actually inserting a label mainly because I can remember where stuff is.  Have I mentioned how cool my ScrapBox is?


The simple fact of the matter is that my ScrapBox is equal to the kind and customer-oriented service provided by the folks over at The Original ScrapBox.  When my crates arrived (we elected to save some dollars and assemble the box ourselves), I began hopping around exclaiming, "Put it together, put it together!" while clapping my hands loudly.  It didn't take Dan long to actually get the box constructed.  However, when we attempted to install the wood veneers on the doors (the lovely cherry wood facade) it became clear that the veneer

was warped and would never assemble correctly.  Since it was the weekend, we schemed all weekend how we were going to ensure that this company made good on our problem.  To our surprise and pleasure, the response from customer service was immediate and efficient.  There was no questions or investigation...just a polite "Where can we send the replacement?"  and "Of course, Mr. Miller that shipment will be a no charge to you."  My replacement veneer was installed in just a few short weeks. 


Fast forward to the CK convention this year.  The same nice man who talked me into a ScrapBox gave me this Ribbon Box for free!  For Free!  It holds 27 rolls of ribbon.  It even stores a multitude of flat-wrapped, packaged ribbon.  I promptly installed this box onto one of the shelves of my Scrapbox.  Now, I am even more organized.  I know!  I didn't think that was possible either!

The prices are not small.  However, this is a piece of furniture in my living room.  Paper crafting and all other sorts of crafty stuff is a part of who I am.  I will always accumulate some stash of craft supplies, whether they are properly organized or not.  Having my stash organized and available, yet shut away for Sunday night Bible study is part of what allows me to create beautiful cards and other crafts on very short notice.  From that standpoint, I consider the cost of my ScrapBox small in comparison.  Check them out!  http://theoriginalscrapbox.com/

Andie


Tuesday, May 8, 2012

Happy May Day


Just a quick post today to catch up on some paper crafting done earlier in the month.  As a child, we would make May Day baskets out of paper cups.  The baskets would be filled with popcorn and some kind of chocolate (usually malted milk balls) and a red licorice handle.  We would take the baskets to our friends and families house, place them at the front door, ring the doorbell and hide.  It was always a ton of fun.

When I had a family of my own, I wanted to keep the tradition going.  As a working mom, at first I just didn't know enough other families so we didn't make baskets.  However, as both kids grew older we began to celebrate.  Growing up in the midwest (rural southeastern Minnesota), everyone had at least heard of May Day baskets and weren't exactly surprised by them.  Here in Arizona, things were different.  Often we would have to knock and stick around, just to check if the recipents understood what was happening.  For the first few years it was just my mom and dad and maybe one neighborhood friend who would receive a basket.  Finally, we had the great fortune of meeting and getting to know the McClearys.  Keri's daughter, Alexis, was in my son, Timothy's, kindergarten class.  They made a connection and we began hanging out.  Keri's daughter, Emme, is the same age as my Katie.  Keri grew up in South Dakota and so she knew what a May Day basket was.  In fact, Keri's mom Vi would make baskets and deliver them and hide.  The joy to watch the children come rushing out of the house with the intention of catching the May Day basket delivering culprits!!  Keri lost her mom last year and I really wanted to celebrate this year, as much for the joy of celebrating May Day as for remembering what a great grandma Vi was.  During loss, I think it is important to remember the good things and May Day, Vi and the McClearys are all very good things!

So, here's my pictures.  They were gobbled up so quickly I only got a bum picture of one without it's red licorice handle.  However, I think the flower and tag decoration is well represented. 


Happy May Day!
(belated)


Andie

Saturday, May 5, 2012

My haul from the CK convention

As mentioned in my previous post, Brandy and I attended the CK Scrapbook Convention a couple of weeks ago.  I thought I would share a few pictures of the stash from our weekend of fun.


This first picture shows some of the supplies that were purchased as well as some of the class kits for the sessions we enjoyed.  The green (!) stylus in the black case are from Heartfelt Creations.  To the right of the stylus holder is a black foam mat.  These two tools will help with shaping of die cut flowers. 


Our first class of the day was a 3D Card Class from Heartfelt Creations.  While we didn't find the instructor to be particularly helpful, the cards were beautiful and went together quite quickly.  Considering the 60 minutes of fun, the tips and tricks on flower shaping and the fact that I now have three Mother's Day cards, I think the class was worth every penny.  I have already used the tools I purchased at their booth (you receive a free stamp set worth $15.99 from their booth).


Here's one design I scraplifted off the Heartfelt Creations site.  My free stamp set is the one featured on the front of this card.  Quite lovely and relatively simply created.  I stamped with a Brilliance silver ink on a die cut frame cut by the Cricut.  The layers of white paper are placed with foam tape for dimensional layering and the bow adhered with a glue dot.  Simple, yet elegant.


The cool closures class was also a bit of a disappointment.  The mini-album that you receive as a part of the class was cool and I expect to be able to do something with it.  However the techniques taught in the class were not "cool" and the instructor was ill (not her fault per se, but her cough made it difficult to understand her at times) so the instructions were not always clear.
The "hanger" is intended to hide journaling under that top.  The mechanics don't work smoothly and the instruction was confusing. 
The button tie closure is rudimentary- basically two buttons mounted with foam tap and a piece of twine to hold the "doors" closed.

Finally, the last technique involved gluing a small magnet on the backside of a tab on one door and on a flower embellishment (shown).  The idea is that the flower holds the tab together and the door closed.  Again, not sure if this qualifies as a cool closure.  All in all, not a particularly satisfying class.  Brandy and I decided to look on the bright side and imagine the ways we can alter the album which in the end is kinda cool containing acetate pages and some great patterns.  When I finish the book I'll definitely post about how it went.  

The next class, digital photography, did not have any projects completed during class.  Honestly, this class was the biggest disappointment of the day.  The instructor was the same as the cool closures class.  However, the instruction was kinda hit or miss.  Although there were good tips, none of the tips were things you couldn't or haven't heard from blog posts or other internet site advice.  The good part to this class is that we received free product at dollarscrapbooking.net (not my kind of product, but free stuff nonetheless) and a free hard bound 5 x 7 photo book through Cheez.com.  I still have to put together my album online, so no endorsement yet, but these giveaways saved the class entirely.  
 
The Melissa Frances card class was so fun, I intend to make a separate post about it entirely.  One last tease, I stopped by The Original Scrapbox booth to gush about my scrapbox and to encourage him because few were stopping at his booth and he looked lonely.  He was so appreciative that he gave me a free gift... this Ribbon box which fits perfectly in my Scrapbox.  This generosity made me so grateful that I intend a ringing endorsement post in the near future.
 Paper crafting with your bestie... fun no matter which way you look at it.  Love, love, loved it all.

Andie

Wednesday, May 2, 2012

Mesa CK Scrapbook Convention

Brandy and I recently attended CK's Scrapbook Convention in Mesa, Arizona.  If you've read our original post which explained why we fashion ourselves viralscrap, you'll know how integral conventions are to our friendship!  As much as both of us hate to be photographed (the ole stalker doesn't like to become the stalked...), I can't resist documenting the event here on our blog.

We started the day off with a 3D card class, rapidly moved to a disappointing Closures class, endured a less than useful digital photography class, went through a little shopping (define "little"), and capped the day off with a sweet Melissa Frances card class.  Singlehandedly, one of the best conventions we've attended yet. 

One of the big highlights for me personally was the chance to attend a class taught by Melissa Frances herself.  Melissa's products have such a lovely pastel color pallette, they have been among my favorite for some time. 
We walked into our last class of the day.  The teacher announced that the regular instructor was not able to be there that day and she introduced herself as none other than Melissa Frances.  I have to tell you that I squealed out loud (though not particularly loudly).  I used Melissa Frances product to create my nephew's scrapbook about 5 years back.  The papers just instantly inspired me.  As such, Ms. Frances will always have a fond place in my heart.  This is a keen example of how important capturing memories with paper is.  I was able to capture his first year (during which I babysat him 5 days a week) in a way that not only put pictures on paper, but encompassed emotion in a way that I still feel today.  I just couldn't resist a picture with Ms. Frances for posterity. 

Certainly conventions have a tender spot in my heart as well.  So you don't get overly sentimental. I cry at coffee commercials, too, making me adupe on the average day.  Either way, this special event just reminds me to appreciate my bestie more.  Thank you for a wonderful weekend getaway, Brandy.  I can't hardly wait 'til next year!

Andie