Background

Saturday, September 24, 2016

Oh Holy Night - A Card Set


I had promised to make improvements to one of my Christmas card ideas and I did jump on that quickly.  Here's the result.  I left the black cardstock die cut made with my Die'Sire nativity die as the stand out on the card and backed part of the die cut with some gold glitter cardstock.  The gold ribbon is once again from the stash - a piece of recycled material that works very well as an offset to the centerpiece.  The sentiment is a Heartfelt Creation stamp onto a Stampin' Up Apothocary framelits die cut.


A few more cards to add to the card stash and I get to say that I've used some of those stored up supplies and tools.  Yay!

Thursday, September 22, 2016

Oh Holy Night - A Christmas Card


It's no secret - Christmas season is on it's way.  I, like many of you, seem to collect craft supplies for making Christmas cards without actually using them along the way.  This year, I made a bunch of cards as my "main" card rather early and decided to dedicate myself to using these supplies to make a small amount of cards to supplement my card sending ways.  This card is one example.

This card is a win and a fail in a few ways.  Rather than detract from your experience, I'll just say that I intend to make some improvements and leave other foibles to remain in the card design.  The centerpoint of the card is the black cardstock die cut made with my Die'Sire nativity die.  I wanted it to stand out and I think that was accomplished.  The gold ribbon is from the stash - a piece of recycled material that I'm proud to have put to good use.  The sentiment is a Heartfelt Creation stamp onto a Stampin' Up Apothocary framelits die cut.

How about you?  Any Christmas cards in the future?  I've been seeing a few of you joining in the preparation.  I'll look forward to more inspiration.  Now, I'm off to plan the improvements to this card design and make a few duplicates for the card stash.


Monday, September 19, 2016

Another Birthday Shaker Card


I mentioned that I had a Queen and Co. foam shaker kit left over as a free prize at the CK Scrapbook convention earlier this year.  Brandy actually won the prize, but make a quick decision she wouldn't be using them anytime soon so she gifted two of the three to me.  I shared this card with you a little while ago.  I was pretty honest at the time that the kit comes with a few shortcomings - namely that the kit isn't precise.

This Foam Front Shaker Stars kit was a little better to get right - probably because there was only one way to bring the card together.  Still - That plaid patterned paper on the left is proof that the cardstock front provided in the kit didn't align with the die cut foam and so I evened everything out with a wrap around "binding".  I also die cut some additional stars and placed them on the front of the card to add a little more interest to the card panel.  The shaker element and sequins are all the same as the previous card.

All in all, I think the card fun and used it for my nephew's birthday - great for a young boy who isn't terribly interested in Auntie's card anyway?!  I'm glad I used this supply up and it isn't languishing away in the stash.  What supplies do you have sitting on the craft table on in your stash that you need to get out and use?  Let this be an encouragement - use up that stash!  You might be surprised at the use you can put those supplies to.  I was!


Friday, September 16, 2016

A Rose Hello Notecard Set


Jennifer Mcguire posted a video recently using a faux metal embellishment technique that she has used in the past.  I had used this technique with colored cardstock and clear embossing powder in the past posting about it here.  Her video prompted me to create this card set whcih had been floating around in my mind for some time.  I just love my 
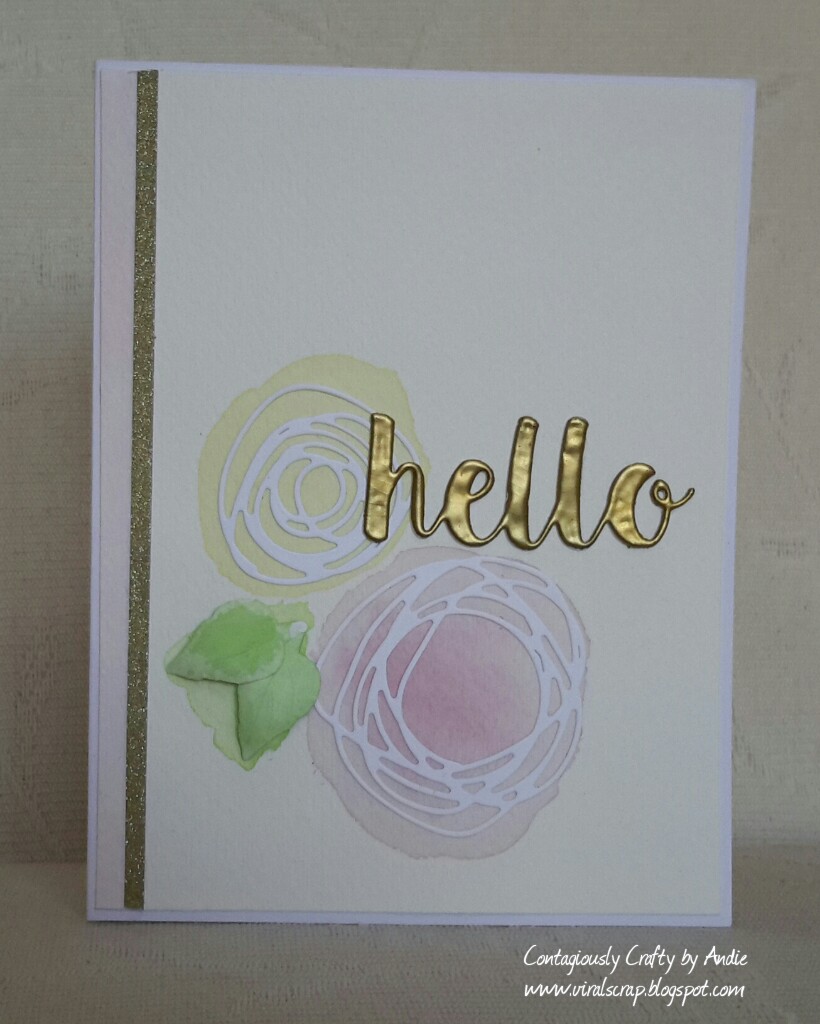
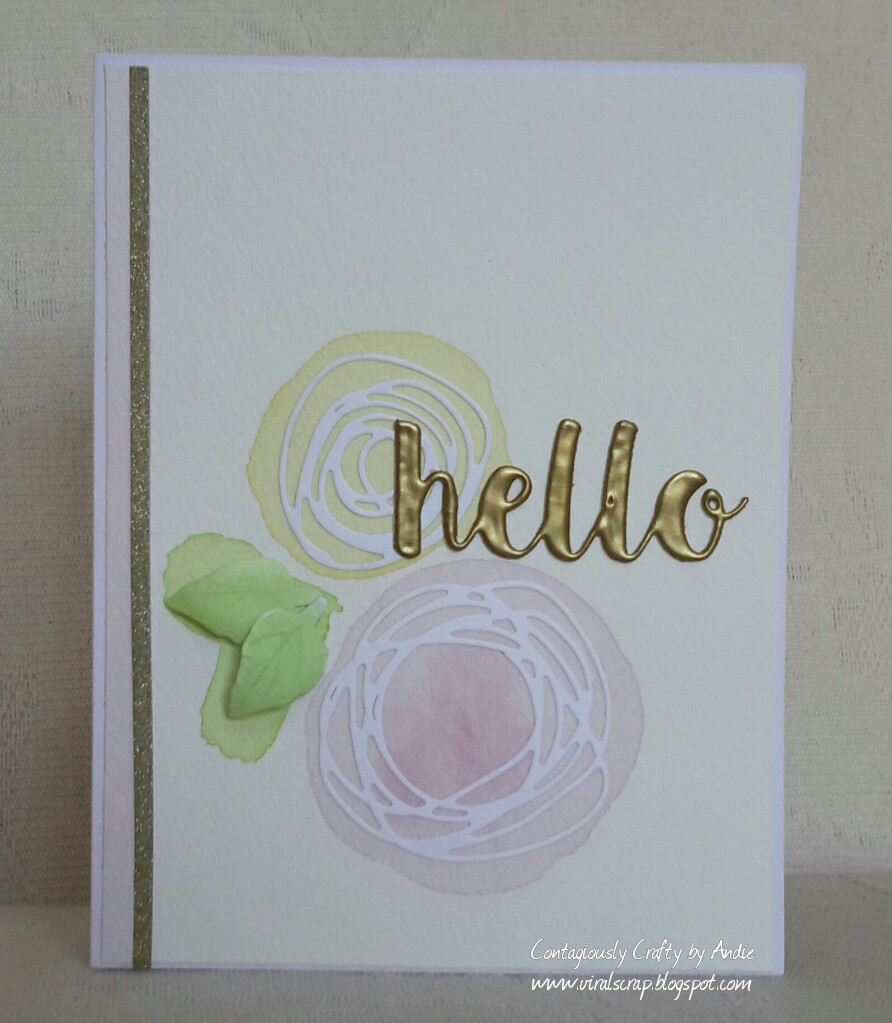
scribble circles dies from Papertrey Ink, but I don't feel that I've used them much.  The idea to watercolor behind them has been on my mind and so I decided to put my idea to work.


At first, I simply die cut a bunch of the circles out using white cardstock.  I considered painting them with coordinating, but darker colors.  I dismissed this idea preferring to use white as the accent this round.  I tucked the idea of coloring them for a day in the future.


I then die cut some leaves using a Spellbinders leaf die.  This die left a slight impression of veins in the center of the leaves. My photography isn't the best, but I did capture some differentiation in color and so you can see the veins faintly in person.


I strategically painted in locations that made sense for the style I was after.  I used a wet on wet technique with very little color from my Mission Gold watercolors.


The finish was made by painting some watercolor paper with coordinating pink or purple and cutting thin strips to go with my gold glitter paper as a left side edge.  The Hello sentiment was created exactly as Jennifer describes in the video - using several layers of which cardstock die cut with MFT's Hello die to create a dimensional look and then several layers of embossing ink/powder combinations which ultimately melts to create this lovely metallic effect.  Any imperfections are a measure of my impatience - the technique works to create a wonderful effect for the card.  I didn't find it difficult at all to keep the back layer clean so that the embellishment ultimately laid down nicely on the page to finish this card with class.

I super love this card set and intend to send a few of these off with some of the butterfly cards made last weekend to a colleague in Ireland.  A small way to say how very much she meant to me during our time working together.

I'm entering this card into the following challenges:

City Crafter Challenge Blog Turning a New Leaf

Simon Says Stamp's Wednesday Challenge Clean and Simple

Hope your days are filled with new and old techniques working themselves out into lovely creations.


Tuesday, September 13, 2016

Crazy Dogs Wishing a Happy Birthday


Good day!  I couldn't resist the urge to share this lovely creation which Brandy has so generously provided.  She used her Tim Holtz Crazy Dogs stamp set and a couple of birthday themed sets to create this panoramic scene.  There is a crazy amount of masking going on here along with some fantastic coloring (I believe this was Zig Clean Color markers).  Any of us dog lovers can probably name these creatures - I see Buster on the left there!  This stamp set works on so many levels - simple design, yet details to catch the eye and create interest.

Adding the balloons, bones and balls just makes this look like a celebration of Buster's big day, don't you think?

I've linked this up to the Simon Says Stamp Wednesday Challenge - Stamp It Up.  Come join the fun.


Sunday, September 11, 2016

Our Beautiful World - Bloom


I woke up this morning and spent a good deal of time browsing through the photos being shared over at Our Beautiful World.  The word prompt this week is Bloom.  Oh the floral bounty they have shared.  I recommend a stroll through those blog posts - it is sure to brighten your day.


I simply could not let the opportunity to join the fun pass me by.  I recently changed jobs and was blessed by a few of the ladies there with a gift of two orchid plants.  This first was gifted a few weeks ago and I must admit - the health of the plant is due to my friend's loving care.  The colors are gorgeous and vibrant and brighten my day each day!


This second, more delicate plant was gifted to me on my last day.  I have asked my husband to care for these lovelies at least initially as he's the one with the green thumb.  The petals are so soft and delicate and I feel the care of these ladies every day I look at my blooms.

Why don't you snap a few photos of the blooms in your part of Our Beautiful World and join the fun?


Thursday, September 8, 2016

Happy Birthday Shaker Card


So, this is a little story about a free gift at the CK Scrapbook convention.  It is no secret that they give away a prize to all or nearly all attendees to their crop nights.  This year, one of the gifts that Brandy won was a set of Queen and Co. Foam Front Shaker Kits.  She kept one of the three and I took the other two.

I decided to use up this stuff in the stash.  This card was made from the Window Foam Front Shaker Kit.  We've been pretty honest on this blog - plugging the products that we love because we use them over and over.  In the case of this shaker card kit - I can say I was decidedly underwhelmed!  Everything comes precut - the foam pieces , a die cut cardstock window to use on top of the foam, everything.  My beef with it all is the fact that the kit isn't precise.  I will own my own kind of control freak when it comes to crafting - things need to be symmetrical and neat.  This was neither.  You can see if you look close the imperfection in how the cardstock die cut (here I colored blue to match the theme of my card) matches to the white foam that creates the shaker window.  You might say that this is because the die cut is upside down or rotated 180 degrees.  You'd be wrong as I tried my level best to get that sucker on there straight.  Also - the outside rectangles - the foam piece, the die cut cardstock front and the acetate to cover the shaker windows - all were different sizes.  This required a trimming of all to match - but I didn't discover this until the shaker was together so I couldn't simply use my paper trimmer.  You can see the slight "roughness" on the upper right edge of the card where my trimming wasn't so exacting.

The price point is pretty great - running around $2.99 retail.  Not terribly expensive and for the novice or someone who doesn't own dies to use to make these kinds of shaker windows - maybe worth it.  However, I have made many shaker cards in the past.  Though my fronts are limited to the dies I own, the end result when I die cut myself is that everything fits together as I make it.  This was unnecessarily complicated (for me) by the necessary trim/adjustments that were required.

Still, a cute card was made and I intend to use this to great effect on a masculine birthday card need that I have.  So, all in all worth it from a giveaway standpoint, but I don't think I'd even spend $2.99 to buy the kit if I saw it on the shelf.  I have one more kit to use and will try to make that work soon just so I use both up without having the second and last one sitting in the stash for too long.

Hope your week is going well and that you are finding a reason to use that stuff in your stash.


Monday, September 5, 2016

Distress Paint Resist


I am working through my Creative Chemistry 103 homework.  Today I'm sharing a Distress Paint Resist technique.  This is a take on a well known and used distress technique - stamping a resist image and coloring with an Ink Blending Tool.  In this case, I used Picket Fence Distress Pain and a brayer to load up the background stamp, Heartfelt Creations Birds and Blooms Collage stamp.  I stamped on white cardstock and allowed the paint to dry.  It is amazing the amount of detail that can be achieved with this technique.  After stamping, I colored the image using the Ink Blending tool and some Mermaid Lagoon and Shabby Shutters Distress ink.  I love the colors that this created.  I die cut the image out using my W-Plus9 Sunshine Layers die.


I created the flowers using some pool colored SSS inks that I had on hand, stamping with my Botanical Rose stamps and die cutting the flowers with the matching dies.  Some of the inking was very dark and others I made light.  I think I prefer the darker flowers, though the light colors look better in person than in the picture.  I paired the flowers with a Spellbinders D-Lites Dragonfly die cut made using white cardstock.


Since I was doing homework, I made an entire set of these cards, leaving the inside blank for a note or to be stamped with a timely sentiment (Birthday, Thinking of You, whatever) should the need arise.  I may give these as gifts or simply use them up.

I'm still sifting through more lessons.  I've a couple of projects to complete and so may have to place my homework on hold.  Hope your week is going well.

I've entered these cards into the following challenges:

Simon Says Stamp's Work It Wednesday Challenge - Stamping

Simon Says Stamp's Wednesday Challenge - Anything Goes

Word Art Wednesday's Challenge 246/247 Anything Goes


Friday, September 2, 2016

Distress Offset Stamping - A Set of Cards


I'm sharing another card set made when completing some of my Creative Chemistry 103 Online Card Class homework.  The class is long over, but I'm just now getting to my homework and this is the second lesson completed.  Tim Holtz, our teacher, shared this technique which starts with using a no-line watercolor technique by stamping in a light Distress Ink such as Antique Linen.  Then a waterbrush and Distress Inks on a pallette (or stamp block) is used to color the image in.  The Antique Linen fades into the background or fully blends into the colors so that you don't see it in the final image.  Finally, after the coloring is compeltely dry, the image is stamped a second time in Archival Ink.  In my case, I used brown in order to get this antique frame to look vintage.


I then used some MicroGlaze to cover the colored area and prevent the Distress Ink (Walnut Stain, Scattered Straw and Vintage Photo) from changing the coloring on my image.  This allowed an even more vintage look as I blended the edges.


To finish, I die cut some Lacy Ovals to create a frame and matched them up to some patterned paper from the stash.  I'm committed to using up some of these lovely patterns and in this case, I'm pleased.

I've enjoyed doing my homework and intend to keep up my *slow*, but consistent pace in order to maybe get through the entire set of lessons.  They remind me how fun it is to use my Distress line of products.  If you have not taken an Online Card Class, I would highly recommend the Creative Chemistry series.  Tim is a fantastic teacher and you wouldn't miss much with the class not being live.

I've entered these cards into the following challenges:

Simon Says Stamp's Work It Wednesday Challenge - Stamping

Simon Says Stamp's Wednesday Challenge - Anything Goes

Word Art Wednesday's Challenge 246/247 Anything Goes