Background

Monday, January 31, 2011

Snowman Magnet

Just a quick snowman to brighten your day.  He was cut at 5" from the Winter
Woodland Cricut cart.  The eyes are plastic "jewels" and the buttons were from Michaels.  The verse was printed on white cardstock and the cut using the Graphically Speaking Cricut cart "image08" Icon Blackout.  Here's what the sheet looked like after all were cut out.  The sample paper is back with a blue cardstock  to show the cuts.

A small magnet

Sunday, January 23, 2011

Creating a Centerpiece that is Magnificent

The Cricut Expression die cutting machine can be a big help to create centerpiece items making for quick and simple card designs.  The black flourish in this card is from the Cricut Circle exclusive cartridge French Manor.


A quick highlight of the card characteristics are:


On this particular card, the only ink applied is a light edging of the black and white patterned paper with a black chalk ink.  I particularly like the chalk inks as they soften the edges of layers and create a smooth transition for the eye from one layer to another.

The center "Joy" is a text box rotated to create a diamond.  The box is filled with black and the text is white.  Here's the basic steps:


Create a text box.  Select the text box and right click to click on the Format Shape menu option.  I'm using Office 2010, but the window that opens in 2007 and 2003 are similar.  Select Solid Fill to reveal your options and select black in our case.


You can rotate the text box to create a diamond shape rather than a square.


By selecting no fill and no line, you are making only the text display.  The final product will print just like this:


I've used this method to create many different outcomes.  This can be very helpful in creating birthday party invitations to include clip art and other images.  An example of one such invitation is:


Each of the birthday cake images are inside a text box that is easily positioned for the greatest visual effect.  All this done in a word processing document without advanced image editing.  If you can figure this trick out, there are a wide variety of uses.  You'll be happier with your outcomes (I hope) and you'll find working on projects more enjoyable.  This invitation was from Katie's 2009 birthday party.  She assumed the alias of "Ivory Tower" for a special spy role play party that turned out to be the Best Party EVA! Someday maybe I'll blog about this party and the elaborate plans we went to to pull it off.

Til then... happy crafting.

Andie


Tuesday, January 18, 2011

Using Word to create images for cards

It's me again- Andie- back to share a few of my techniques for creating interesting cards on a very fine budget.  One key tool I use in my Word program.  Specifically, I like using the text boxes and free clip art in my cards.  Here's a good example:


This card was created to give back to my boss on Boss's Day this year.  It was a small, but hopefully meaningful way to say thank you for everything this past year.

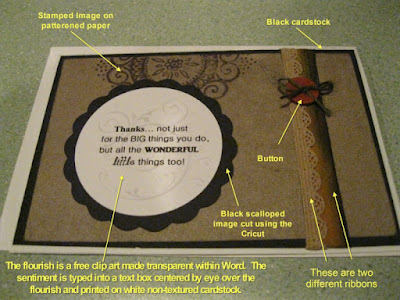
Here's a quick diagram of the elements used:


The most unique of items on this card is the sentiment.  I scraplifted the idea from a card in a magazine.  The card had a birthday sentiment overlaying a light pink piece of birthday cake.  I thought it would be a mature, elegant way to say thanks.  So here's how I did it:

Step one:

Find a free clip art in a similar shape that you want to type.  In my case, I was shooting for a circular image and found the flourish.  I added the flourish image to my page:


Then I created a text box in a circular shape, typing my sentiment using several different fonts to create an interesting layout.  I layed that text box over the image.


After this point, I needed to get the image to "fade" into the background.  This is accomplished by selecting the image and then right clicking to reveal a menu item called "Format Picture".  Under the Format Picture window that is opened, select the Picture tab.   Modify the Brightness and Contrast settings until the image appears as you would like to print on your cardstock.

This image shows the actual circular text box used to create the sentiment.  Both the text box and the image can be copied and printed onto an 8 1/2 x 11 piece of cardstock many times.  Use a circle stencil, circle cutters or your Cricut (using the centerpoint function) to cut out the image and place on a scalloped embellishment.
Have fun, don't hesitate to try out making your own image/sentiment combinations!

Friday, January 14, 2011

Quick Little Post

My sister-in-law, Lorie, has graciously hosted a Christmas breakfast every year since my husband and I started dating (with only a very few exceptions- one being the lovely wedding of her eldest daughter a few years ago).  It's been twenty years now and I can say that every year this is an event that our whole family is looking forward to.  This year, I had the pleasure of creating the placecards used to identify where everyone sits.  There can be upwards to 30+ people at this gathering (if we're all together like this year), which makes having placecards to tell everyone where to sit simply a necessary process to speed access to the delicious food.

Here's a quick picture of the cards:


The white placecard comes from the Cricut cart Thanksgiving.  The size is approximately 2 1/2 in.  I cut out an entire 8 1/2 x 11 sheet of scratch printer paper to identify the location that the cards would cut each time.  Then, I created a word document with text boxes in the locations that I wanted the names to be printed.  Here's an example of one sheet:


After cutting out all of the cards with the names on them using the Cricut, I then cut out the Santa hat from Joys of the Season.  I believe the size is 1 3/4 in. tall.  I cut the hat form out of red cardstock, then I cut the layers (brim and pom-pom) out of white cardstock.  Using some Martha Stewart white tinsel glitter and FlowerSoft craft glue, I created a very "snowy" accent for each hat.  Sorry about the picture quality, I'm still learning...


This was a ton of fun and something I can see me using in a variety of ways.  I am grateful Lorie let me help.

Andie

Wednesday, January 12, 2011

Card Making

To be a real live blog is more challenging than you suspect and more simple than you suspect.  Brandy and I have been absent during the past 8 weeks mainly due to the volume of work, social commitments for the holidays and crafting we've accomplished.  This is (hopefully) the first in a series of posts that will make up for lost time.

I thought I would share a bit about my card making process.  Anyone who knows me knows that I prefer to be "frugal".  This is a kind way of saying "cheap".  Card making is the ultimate challenge to find ways to make beautiful cards with what is lying around.  Unless I'm making my Christmas cards, I don't really want to buy supplies for making cards.  I also don't enjoy card making that takes a great deal of time.  So, I usually scraplift a design or six and create my own version with left over paper and/or embellishments.  Here's one example:

This is a Thanksgiving card that I made a few years ago.  The only purchased paper was the autumn leaves matting paper.  The Bible verse and the tree image were printed on non-textured cardstock using my HP Photosmart printer at home.  I typed the verse into a Word document, added the image and printed onto the 8 1/2 x 11 piece of cardstock (later I added multiple copies of these same images to fill the page).  I trimmed the printed cardstock to the edges by eye and then cut the autumn leaves paper to mat and the metallic gold cardstock to highlight.  Everything is glued down with a strong glue stick (I like the large size Scotch brand myself).  The brads were placed using a paper piercer through the autumn leaves paper before it was glued to the brown card.  I used a black marker to write a kind word of thanks on the inside of the card.


My inspiration was a spring card I saw in a magazine.  What I liked about the inspiring layout (which had none of my embellishments or style) was the left justification- i.e., no matting on the left side of the card, the landscape orientation, and a row of metal along the bottom.  The inspiration was bright, cheery and cool colors.  My final product looked to me like the warm, muted time of the year when we stop and ponder how blessed we are and the reasons why we are grateful. 

More cards to follow, hopefully later this week.  Just be inspired and don't sweat whether your card turns out to look like your inspiration.  Everyone would rather receive one of your creations than some copy made from another person's idea.