Background

Saturday, February 23, 2013

Valentine's Day Craftiness


So, I got a bug in my backside the week before Valentine's.  I'm looking at my huge Scrapbox filled with crafting supplies and I said to myself, "Self, you could make a whole Valentine'sy thing without spending a dime".  I had seen a similar design while trolling through the internet.  I didn't even put a pin in it (I've tried Pinterest, have you?) or bookmark the page, so I can't give credit where it is due.

Neither which way, I first went shopping in my Scrapbox, coming out with a pile of red and pink cardstock and three matching patterned papers.  First I made rectangular boxes using the instructions I've found here.  I ended up, after a few tries, making my box out of a piece of paper that is approximately 5 x 7.  You can play with the sizes of the score lines and make your box size unique to you.  The folded back edge around my box is approximately 1/4 in.  The surrounding "box" is just a 3 1/2 in. x 9 in strip of paper.  I scored the paper at the correct intervals to give my treat box room to slide easily.  The far side overlaps approximately 1/2 down and was adhered with Glue Lines.

 
The Happy Valentine's Day is a free clip art piece that I printed on white cardstock and cut using my paper trimmer.


The flag detail was cut using Accent Essentials on my Cricut.  I nudged together two rectangles that I resized as indicated in the picture to the left.   I selected Weld to make the two rectangles cut as one piece, thus creating my flag.  The Flag was stamped using some flourishes from a Recollections set and my Coffee Archival Ink.  The white, glitter brad comes from a Queen and Co. set so old it really needs to be used up.
 
Finally, the hearts were cut using my Cricut and the Lovestruck cart.  I cut all kinds of hearts out of the patterned paper and the solid cardstock scraps at 3/4, 1, and 1 1/4 inches.  I then simply sewed them together to make these lovely 3D effect pieces for the top of my mailbox.

I created nine of these bad boys for my co-workers, filled them with chocolate and left them as a holiday message on their desks.  I truly meant to get these up to the blog sooner, but said job is consuming and time is valuable.  I'm currently designing my Easter cards (I'm going to give it a try this year) and am finding my creative juices flowing a little slowly.  I've my idea, but translating that to a piece of paper is taking some trial and error- read: Time.  Hopefully, I'll have something else crafty to share with you before then.

Andie

Wednesday, February 20, 2013

Wacky Phoenix Weather

Spring Training facility at Salt River Field

We had a sudden and completely unusual winter storm here in Phoenix, Arizona this afternoon.  I was working in Scottsdale with my husband, Dan.  We'd had rain all morning and the rain this afternoon seemed a little slushy so we headed home early.  This was the sight on our way home.


You'd have to live in Phoenix to know how amazing this sight really is.  My husband is an Arizona native and he cannot remember something so incredible. 
Right outside Brandy's company office


Dan was quick to point out that this isn't really proper snow, but is actually graupel.  Weather.com defines graupel as:

A form of frozen precipitation consisting of snowflakes or ice crystals and supercooled water droplets frozen together.

You can see that  the precipitation is very chunky and slushy.  We didn't see this coming down, just the aftermath in the bumper to bumper traffic.


What a strange event to see the freeway sign stating "Weather Driving Conditions Drive With Care".  I'm pretty sure anyone where it actually snows will laugh heartily at this sign seeing the sunshine and knowing the real conditions.  However, this is really good advice because generally Phoenix motorists are horrible drivers in anything but clear, sunny weather.  By the by- Dan took these pictures from the passenger's seat.


This one's for our records, folks.  We won't see this again soon.

Andie


Sunday, February 17, 2013

Lovely Internet Friendships

How much do you love the doily stamping?!!!?!!
Look what I received in the mail Thursday!  I felt like a giddy little school girl.  Ok, that sentence needs a little background.

I am a confessed introvert.  I think Brandy qualifies as well, but there is some debate if hers is inherent or caused by the long hours at work which demand some time alone after all that time spent with others.  As a confessed introvert, I will gladly tell you that making friends is a challenge to me.  This is why blogging has become such a wonderful gift.  I can follow a lady's blog and she doesn't really have to know me, there's no compulsion for her to respond.  Yet, I know what a tentative crafter I am so I feel compelled to comment on blog posts and offer the kind and type of encouragement that I crave and need.  Then the most wonderful of events, your blog friends reach out and comment on your posts.  From there the blog friendships grow.  And transform into challenges and reciprocation that thrills my heart.

I received this lovely card in the mail this week.  Ms. Jessica blogs her scrapbooking and other random paper crafting over at Errant Scraps.  I specifically mentioned Jessica in a post earlier this month.  I had scraplifted Brandy's card design after receiving a kindly meant challenge from Jessica.  Jessica took my challenge and made this card.  After making her take on the card, she dropped it in the mail to me.  You can see that Jessica lifted the embossed background, the black matting and the floral details.  Then she all up and knocked it out of the park tipping that front piece, adding some sewing elements, and second generation stamping to some already lovely patterned paper.  Did you notice how she created her own architectural embellishment with the sewing of the sentiment?  Lovely!  Her complete card recipe:

Lifestyle Crafts Dainty embossing folder, black album liner paper, MME Dear Santa paper, Unity "Grandma's Closet" stamp set (quick, someone tell me I don't need another stamp set!), Tim Holtz Walnut Stain, Recollections Crocheted Doily embellishment.

Please join me in watching Jessica grow and share her creations over at Errant Scraps.  I proudly count her among my blog friends and I definitely think you should too!

Andie

Thursday, February 14, 2013

Happy Valentine's Day


 I thought I might share with you the cards that I made for Valentine's Day this year.  I sent seven of these bad boys off with enough time to actually arrive on time to their recipients.  Shocking!

The original inspiration for this card was a challenge over at the Moxie Fab World.  The challenge promoted a new special edition magazine consisting of 75 Creative Card Challenges.  The deadline for submitting has long since past, but I was challenged and came up with this card set because of their inspiration.


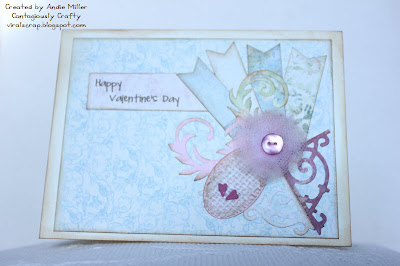
I used an old Prima 6 x 6 paper pack to create the embellishments for this card.  I had previously used some of the papers, so those scraps became my thin "flags".


I plucked out appropriate background pages to work as the canvas for my design.  The challenge was to incorporate ten (count them, 10!) embellishments on any one card.  At first I didn't think I was up to the challenge.  But I stuck with it gathering together lots of small pieces/dies to see how they could fit together.


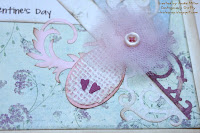
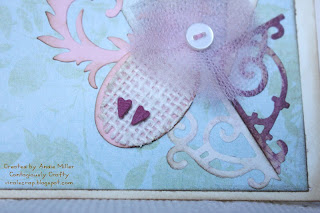
The floral swirls are from a Spellbinders die set, Floral Flourish.  The "ironwork" pieces in the lower right corner come from Sizzlet's Architectural Accents dies.  The oval tag was also a Sizzlet oval tag die.  Keep in mind folks, these tools are OLD!


The great thing about the pressure cutting die systems that is a significant advantage against the machine die cutting like the Cricut is the ability to cut thick materials and/or fabric.  The burlap accent was cut using the oval tag die (it has two cuts, one for the shadow and one for the oval tag).  One run through the Tag-a-long and the burlap piece was cut.  Some fraying occurred at the edges, but it only adds to the design here.  The two tiny little hearts were cut using my Quickutz die from a letter set.  I image these old tools have a discussion after this day of crafting.  They'd been left to languish for years and suddenly put to good use.  It's like I went shopping and bought something new!

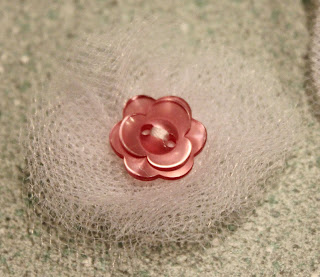
The tulle flower developed from a whim I had in December to make tulle wreaths for some cards.  Anni over at Handgathered inspired me, but with my illness and all I just never quite got around too it.  So this lonely roll of tulle was begging to be put to use.  After trolling around the internet and seeing a couple different methods, I sort of pieced these flowers together experimenting as I went. 


The first step was to cut approximately 7-8 inch length of the tulle creating a 6 x 8 inch piece.  I folded the piece into thirds along the long edge and turning the folded tulle and again folding into thirds creating an almost square piece of folded tulle.  I then sewed the center together with some thread and a needle. 


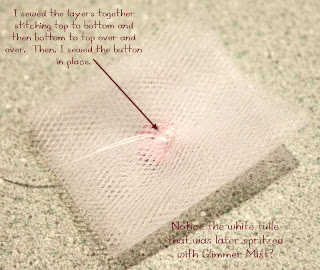
After sewing the layers together, I sewed the button in place.  The color is off in my pictures (I was working at night, drat that job providing a steady income!), but I used white tulle that I ultimately spritzed with some Glimmer Mist to make it more pink for my cards.


The last step was to trim around the edges using a random, wavy pattern and separating each layer.  Finally, I twisted each layer of tulle in different directions to create dimension.  This was a relatively random effort.  It was tough on my inner perfectionist to let these flowers be asymetrical (it is required with the twisting of the tulle), messy and ultimately lacking in uniformity.  However, they just didn't look pretty when I tried to even everything out.  Arghh, inner perfectionist- go sit in the corner for timeout!


Nevertheless, I hope this brings a smile to folks' faces as they open up their card.  These cards aren't traveling far, but they send fond wishes if not a bit of chocolate!

Happy Valentine's Day to you all.


Andie

Saturday, February 9, 2013

Sending Sympathy and Prayers


The company I used to work for (and recently returned to do some contract work for) experienced a layoff in January and the sweet receptionist, Melissa, was unfortunately one of those let go.  Melissa is a single mom, so the loss of income was very concerning.  In and amongst all this change, her mom turned sick (she'd been ill off and on for the past year) and passed away three weeks after the layoff.  Melissa had found another position by that point, but the loss of her mom has been deeply felt and certainly has affected Melissa's ability to work.  Fortunately, the new company has a very big and understanding management, so they've allow Melissa some time to deal with things.  My heart feels wretched for her losses- they seem too many even from the distance of a co-worker.  I wanted to send my heartfelt sympathy for her loss so I made this card.
 
I had this little embossed scrap of white paper hanging around and it seemed the perfect frame for my glitter butterfly.  The embossing folder is Brandy's and I had ran the piece of white cardstock through her Grand Calibur at a crafting evening months ago.  Instructions for making the butterfly can be found in this post.   I used Scattered Straw, Worn Lipstick and Peeled Paint Distress Ink with my blending tool to created the multi-colored background.  Everything is edged with Vintage Photo Distress Ink.  The fiber and pearls were from the scrap heap, I mean, Scrapbox.  

I'm sending my prayers to Melissa, her daughter Jullian and the entire family.  Loss is hard.  This is what I can do.

Andie

Tuesday, February 5, 2013

Little Late Christmas Wrapping Idea

Pardon the slightly blurry picture.  I just had to share this cool Christmas wrapping idea with you.  It is late to the blog.  My good friend Keri approached me in early December to once again use my Cricut to make some embellishments.  You might remember her requests for birthday parties (you can view here and here with the single most popular post by this blog eva!). 

Since Keri is such a good friend and I always enjoy her creative inspiration I rapidly agreed to help.  Her request was to cut out single letters using my Cricut Platin Schoolbook cart.  The letters were cut at 2", 4", and 6" (I think!?).  Matching letters were cut from coordinating cardstock and adhered together to reinforce the tag.  Keri's idea was to use the letters to indicate who the present was for instead of traditional tags.  All packages were wrapped in kraft paper and wired Christmas ribbon wrapped around the package.  A hole was punched in the top of the letter and tied to the ribbon with a piece of fiber (whatever Christmasy color that was on hand).  Different colors and styles of patterned paper were used so that folks with the same letter (Alexis and Aiden) could still figure out which present was for whom. 

Tell me that wasn't a cool and hip idea?  I warned Keri that any picture of contagiously crafty ideas text to me are automatically subject to the disclaimer that they may be used on the blog.  She graciously acknowledged said warning so I've shared with you here.  I also warned her that after the appropriate 1-2 year wait I fully intend to snag her idea and put it into good practice myself.  I've bookmarked this idea...

I've heard rumors that a new request for party help might be in the works.  No details yet, but the cost of my help has now become understood- I get to share Keri's great ideas and final product with all of you.  I can't wait to get busy....

Andie

Saturday, February 2, 2013

A Little "Throw Down" Set of Cards

I recently posted some Tattered Blossom Heaven created by Brandy.  Brandy had scraplifted the card idea from Heartfelt Creations website and I commented on what I loved most about Brandy's interpretation.  One of the lovely ladies whose blog I follow "threw down" on my comments.  Jessica of Errant Scraps (go check her out, she's a prolific scrapbooker that constantly inspires me) wrote the following:


Beautiful cards! Andie, your last paragraph cracked me up. When are you going to post your interpretation of the card? huh? huh?


I've recently returned to work, so my personal productivity has taken a huge hit in the creative keister.  So my initial reaction was to start mealy mouthing about how well Brandy did, how I couldn't possibly live up to her fine example.  Then I considered Jessica's dedication to her craft.  She has two young boys and still finds time to regularly create and post about her scrapbook pages.  This is one of the things I love about following her blog.  She also regularly uses sketches and competes in online challenges.  I've not attained such status yet posting rarely in challenges, but I long to join her.  So, I took the challenge in all it's well meant cheekiness and tried to give it a go.  Here's my results:


I don't have a Grand Calibur.  This limits my ability to die cut Spellbinders dies and limits my embossing abilities.  As you can see, my version does not have the embossed background.


Additionally, my stash of Heartfelt Creations stamps in much smaller (a situation I plan to correct at the scrapbook convention in April).  As such, none of the stamps are from Heartfelt Creations.  When I went looking for what I was going to use, my first reaction was to head off to Michaels or Joanns for supplies (that "just right" color of pink or yellow, a perfect stamp set, etc.).  However, Jessica will also frequently comment on her use of the stash to meet challenges. 


I knuckled my inner shopping diva under with a strong right hook and stayed home,  Instead I went "shopping" in my Scrapbox.  Let's be honest, its like my own little LSS that doesn't charge for supplies.  O more accurately, charged for the supplies a while ago.


I found a EK Success stamp set with the large swirl which has solid tulip like flowers I've hidden beneath the flowers cut with Heartfelt Creations' Posy dies.  I am able to cut all by the two largest of these dies on my Sizzix Tag-a-long (very old tool indeed!).


I used some Good Earth Elements to create the center for each of the flowers.  The sentiments both come from a small stamp set for the month of May.  The little swirl comes from a Recollections stamp set that also has a solid flower I've hidden. 


All stamps were made using my Vintage Photo Distress Ink.  This created a slightly shabby look to some of the stamping, a contrast to the stunning crisp look on Brandy's cards.

All in all, I like my final creations.  I still think Brandy's result is more stunning, but that is the great thing about creating for yourself...  The people I give these cards away to may never have actually seen Brandy's creations so they can't compare.  Also, the fun is in the creating and I can say that I was challenged in more than one way by doing this project.  Thank you Jessica.  Keep on keeping me honest and out of my comfort zone.  I need the help!

Andie