Background
Sunday, December 30, 2012
Purple Cow- CraftGeek Pin It
My MIL graciously gave me this neat crafty tool for my birthday a few month back. I've been so busy with sicknesses and Christmasy crafts that I didn't have a chance to photograph and share. This gadget is Purple Cow's CraftGeek Pin It. This gadget applies decorative metal elements to the page much like a staple. My trial was to adhere the leaves to this piece of brown cardstock. It is really just as easy as using a stapler. I'll have to play soon and share the results.
Andie
Thursday, December 27, 2012
Poinsettia Fun- One way to celebrate 80 years of a wonderful life
My husband Dan's dad, Ed, turned 80 years young yesterday- the day after Christmas. His birthday has always been something of a combined celebration with Christmas that is eased by the fact that his beautiful bride, Pat, is born just a few days before Christmas. Since 80 is such a momentous occasion, the family planned a dinner celebration in his honor. Dan is the seventh child of this large family. Five of the children live here in the Phoenix valley with his mom and dad living a close (2 1/2 hours away) drive in Flagstaff, Arizona. Two brothers live in South Carolina. Though there hasn't been a lot of opportunities for the entire extended family to visit over the years, those visits are precious.
In an effort to celebrate this wonderful brother, dad, and grandpa's life, his bride purchase these photo mugs for all the family members (40 strong!). I had the great fortune to be asked to wrap up some delicious cookies to go into the mugs as a party favor. You might remember the Save the Date invitations that I shared earlier. So many of the supplies had leftovers that I've included a couple here in the favors. The burlap tag was a leftover and I picked up the kraft paper theme with Hobby Lobby's kraft tissue paper. A little navy hemp twine ties in the table colors and the poinsettia is a nod to Christmas. The poinsettia were cut using Brandy's Spellbinders Layered Poinsettia die. I ran each of these through the Grand Caliber twice in order to create the final embossed look. Finally, I splattered watered down white paint (technique from SaintsRule! who first did this to great effect) using an old tooth brush to create the snow-sprinkled look on the poinsettias. I'm just so pleased to have helped in this way and super proud of the final result.
Happy Birthday, Ed!
Love,
Andie
Tuesday, December 25, 2012
Merry Christmas
Brandy made these astounding creations for her Christmas cards this year. The amount of work and effort that she poured into her beautiful creation is simply inspiring. This card was a labor of love that was almost the year in making as she pieced together the intricate components of this beautiful card. Christmas is the perfect time to stop and consider how very blessed we all are. I am blessed very much by my bff and her creativity. It binds us, but has quietly become such a small part of our friendship which is only a reflection of how very large our friendship has become!
My personal card has a rich green background that I now realize is not accurately captured in this photo. Yet look at that stunning detail and beautiful color combinations!
I am going to try to list the components of this card. Each die cut piece is embossed including the corner stamps, the frame, dove, poinsettia, and leaves.
Poinsettias and Leaves- Heartfelt Creations Petite Poinsettia using the Layered Poinsettia Shapeabilities Die Set
Lace "Fence"- Heartfelt Creations Decorative Lace Border which was spritzed with Glimmer Mist and crumpled while still wet. The lace was then pulled apart to create the fence-like structure.
Dove- Heartfelt Creations Holiday Dove using the Heartfelt Creations Christmas Cheer Die Set
Frame- Frame cut using Spellbinders Labels 20 Mega Nestabilities die and embossed using Heartfelt Creations Holiday Poinsettia Candle stamp set and Heartfelt Creations Rye Grass Flourish stamp set.
The Heartfelt Creations Rye Grass Flourish stamp set was also used to emboss the corners of the card base.

Here's a few tags Brandy made from the spare parts. Even the spare parts are simply fabulous, don't you think? Please join me in encouraging Brandy. This was a fair bit of work for a woman who works long hours supporting a large organization. She is the very definition of dedicated, but I enjoy her dedication to her art and craft very much.
Andie (on behalf of Brandy)
Monday, December 24, 2012
Merry Christmas Eve!
I had previously blogged about my inspiration for this year's Christmas card. I saw the rather "summerish" card and knew that it was just the right design for some Graphic 45 paper that I had seen on sale at Embellish It! I purchased the patterned paper for a song and thus began my endeavor. The white cardstock sentiment is embossed using Spellbinders Snowflake Impressabilities. The stamped sentiment came from Close to My Heart's Christmas Card Chatter set. The stamp was made using Vintage Photo Distress Ink. What a mess I made distressing all those edges to the card! Nonetheless, it was worth it in the final analysis.
As we celebrate the birth of our savior, the Lord Jesus, I pray that God's glory might be revealed to you in big and small ways this season. From our house to yours:
Andie
Sunday, December 23, 2012
Paper Bows
One last quick post to share with you some crafty fun I enjoyed while dressing my Christmas gifts. I found myself tired of the old curling ribbon routine and all the store bought bows were smashed, so I trolled around the internet and stumbled upon these instructions for making paper bows over at Splitcoaststampers. Viola! My package decorations were made. I have found that as my children grow older (14 and 16 now!) gifts are more expensive and, thus, fewer in number. This makes dressing each package doable.
Here's a few of the packages under the tree. Like my decorations on the tree, I like eclectic looks for my packages. No uniformity for me. We collect a bunch of gift bags and wrapped gifts in boxes depending upon the availability of supplies and the ease of packaging.
These are just a few of the bows I made. You can see the ornament tags I created earlier in the week hanging from each package. This was all in good fun and with the kids help, Christmas hasn't been a rushed affair this year. We're looking forward to a simple, but delicious dinner this evening and watching a movie together- maybe the Lord of the Rings rewatch. Either way, we are all hoping this finds you enjoying your Christmas wherever it finds you.
Andie
Saturday, December 22, 2012
12 Days of Christmas Cards
Around my house I am constantly looking for ways to consciously anticipate Christmas. This habit is one of the ways that I try to keep the real meaning of Christmas present in my mind and heart as well as in our family. As such, we've celebrated Advent and the 12 Days of Christmas for the past few years. Sometimes loving friends bring gifts every night for the 12 days leading up to Christmas, sometimes I've made the 12 Days of Christmas gifts for others, and usually we celebrate Advent with Bible readings and other Christmas thoughts while lighting candles on our wreath.
This year I wanted to provide a small gift to the ladies I've regularly attended women's Bible study with. When Lori at SaintsRule! made this beautiful card, inspiration was born. The design allowed for quick assembly line type production and was perfect for creating 36 cards in rapid succession- the only way this gift was going to come together during this busy season.
Like any good craftaholic, my first stop was Hobby Lobby where I picked out four coordinating papers (those on the card at the left here). When I returned home realizing that this wasn't nearly enough paper, my first thought was to return to Hobby Lobby and see what else I could find. Then I returned to my real life where we don't own a money tree but do own a Scrapbox. Shamefully, it's like my own mini-store. So I went shopping and found all the other lovely Christmasy papers that were languishing in my stash.
Thus, these babies were born. I've captured images of the six different designs that I created from the papers. I made six duplicates of each attaching 12 different verses to the cards. The verse frames were printed onto cream cardstock and cut using my Cricut. The technique is similar to what I used here. This can be a little tricky, but with some trial and error, very doable. The trick I suppose is to learn to let a piece or two of cardstock go when the cuts don't exactly line up to the printed sentiments. All paper layers were inked on the edges with Vintage Photo Distress Ink. The twines were taken from the stash- again, who needs a craft store when you've stored all your various leftovers. It is remarkable how well the colors coordinated.
I punched a small hole at the top of each card so that the recipients could re-use these cards as gift tags and I purposely didn't seal the envelopes they came in so that they could also be re-used as cards. They are open faced- no folded "card" behind them. I chose verses based on this list online, but modified them slightly to fit/match the version and intention of my gift. A handwritten note encouraged these ladies to open and read one per day until Christmas Eve and to contemplate the wondrous gift of our savior in anticipation of the coming birthday celebration for Jesus. Our last study for this year was the day before the 12th day before Christmas. It was perfect timing. Now, if I get my act together, I just might share the other 12 days of Christmas that I'm planning for my niece and nephews. These 12 Days will be delivered Christmas Day to be celebrated after Christmas and will include gifts that are a little more concrete for the littles. We'll see how these last four days of anticipation play out for me.
Andie
Thursday, December 20, 2012
Christmas Gift Tags
I thought I would share a quick gift tag idea. I used the Cricut Joys of the Season cart to cut these cute ornament tags out. The base was cut from solid cardstocks and the <bulb2> ornament creative feature image was cut from various scraps of Christmas patterned paper I had on hand. After gluing the two
layered pieces together, I applied a very thick coat of Crystal Accents over the patterned paper. The large quantity of glue takes a little to dry, but the final effect is an epoxy type finish that creates dazzle with little effort (besides patience while they dry). I used an old Martha Stewart acrylic stamp set to stamp To and From on the back side and these are on hand to dress up all our packages. I usually tie a piece of twine, hemp, or crochet thread to the ornament to hang from the package.
Hoping your Christmas is merry and bright.
Andie
Tuesday, December 18, 2012
They're off
I did it! My Christmas cards are in the mail (sans 2 cards that my husband specifically needs to add a handwritten note to). This year's card making effort was particularly satisfying. I enjoyed the process of making the cards, writing my picture collage "letter" and addressing the cards. The Postal Service did me the kindness of creating a stamp design that coordinated. I'll keep the final design a secret til Christmas. Christmas secrets are the best and I know I blew enough secrets as a kid (I was terrible at keeping a secret!) to be a faithful secret keeper as an adult. I'm now feverishly finishing up a few crafty goodness for the holidays that I hope to share this week. Wish me productive blogging time!
Andie
Friday, December 14, 2012
Baby Doll
My Katie has, alas, grown too old for baby dolls. It is a sad fact of motherhood- they all grow up. Never one to let an opportunity to look for the bright side pass, this means that I must look around for other opportunities to mother/smother (is there much difference?) little girls. Fortunately, I have a young niece, Mackenzie, to focus on. During our trip in October to Colorado to visit my Grandmother, I decided to help an aging grandma out and finish a crochet project for her.

Grandma had purchased a Mary plastic doll. She had previously made some crocheted dresses for one of her other grand-daughters. However, as she gets older her arthritis makes doing some of these things just a little harder. So she requested some help. I made the white dress first using the Mary dress pattern. The white yarn is also from Mary. This yarn is so super soft. It is a must have when making clothes for this baby doll.

The first dress went together so quickly I made this yellow dress using some I Love This Cotton yarn from Hobby Lobby.

I altered this pink dress just a bit to make it more of a sundress look (no sleeves). This is also made using Hobby Lobby's I Love This Cotton brand.

After they were finished, we went to Joanns and found these paper flowers and ribbon to sew to the front finishing the dresses off nicely. The entire doll and set will be a gift to my niece, Mackenzie. I think she is going to love it.
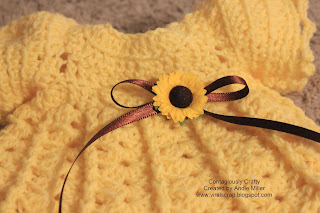
When I make something to give away, I am always hopeful that the person will actually put that something to good use. My hope is that Mackenzie is asking Auntie for some replacement dresses in a couple of years because of all the wear and tear this baby has been through. I'm looking forward to Christmas, aren't you?
Andie
Monday, December 10, 2012
Happy Hanukkah
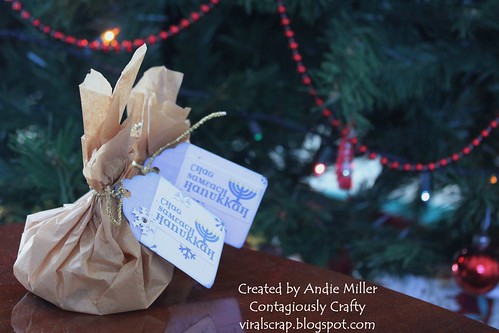
We do Bible study on Sunday nights with our good friends, Dale and Pat. Since the Jewish celebrate Hanukkah this week, I thought it might be fun to make these quick and easy gifts to bestow on our friends when we arrive for Bible study. Though we are all Christian in our faith, it is good to look around and see what God has done and we certainly agree that it was God at work if the oil burned for eight solid days. Yeah God!
The tags were cut from Plantin Schoolbook out of kraft paper and covered with some coordinating patterned paper. The sentiment is from the recent free downloads at Paper Crafts Connection with a small snowflake eyelet to finish the look. Each bundle contains a handful of chocolate coins- a traditional gift usually given to kids but worked nice in this context- wrapped in kraft tissue paper.
chag Chanukah sameach- which, directly translated, means "Happy Chanukah Holiday"
Andie
Friday, December 7, 2012
A little non-Christmas and non-crafty entertainment
I've been battling what I comfort myself with calling the flu for over a month. This episode started a little more than a week into November when my son (who has asthma which complicates every illness) was sick for a solid week. Up at night doing breathing treatments, running up and down the stairs getting him water and snacks (that remained unfinished I might add), and trying to plan for Thanksgiving and Christmas which seemed to be rapidly approaching. Needless to say, I barely kept up with the first two items on my list leaving the third to wallow sadly.
However, I was joyful that even in this tough circumstance I was not working full time and able to be there without guilt or distraction and certainly looked forward to him feeling better. I could also look forward to not having to return to a boatload of work that had piled up as so often happens when you are out of the office for an extended period of time.
What followed was the very methodical progression of passing this illness from my son to my husband and subsequently to my daughter and myself. I stayed home to nurse my daughter and felt crummy myself for Thanksgiving. After a good bout of feeling sorry for myself, I decided I would turn this whole episode and doggedly determined I was feeling better. So, a week later when the flu looked me square in the eye, laughed maniacally and then pounce on my chest for a long batch of sustained, deep coughing, I gave up. Urgent care diagnosed bronchitis and filled me up on prescriptions. My daughter quickly followed with the same and so we find ourselves mid-December with everyone having a check mark next to "Bronchitis" in the official Miller health history. I am decidedly feeling better and looking forward to getting back to crafting the holidays soon.
As if to shine a ray of bright light and encourage me, this morning I saw the skies above my house surrounded by hot air balloons.
 There were easily seven to eight balloons overhead. Our queenly St. Bernard, Abby, is very put out by the presence of this "attack from the skies". She is usually a quiet dog that barks once or twice and quiets down for hours (because she sleeps so much). However, there was little rest as she tried to warn the entire neighborhood as well as surrounding counties that we were all gonna die! I shushed her as much as I could (with her intermittent Ruh Ruh Ruh of protest) and thoroughly enjoyed the sight. The balloons quickly landed and she's been asleep since. Rough morning- but not for me! Now, I'm off for some holiday shopping and errands.
Hoping your contagiousness is of the *crafty* variety all through December.
Andie
Sunday, December 2, 2012
Masquerade
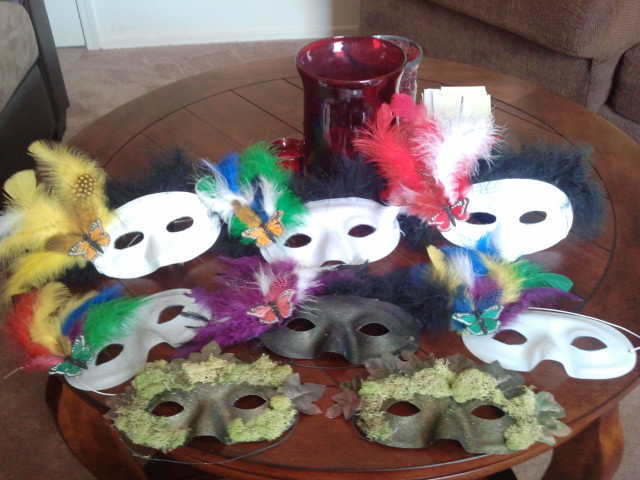
Brandy's Aunt Ruth decided that she wanted to host a party recently. After a little discussion that I am not sure how the subject came up, the idea of masquerade bloomed. Brandy, of course, volunteered to make up the masks and bring them to the party. I'm going to share with you her creations.
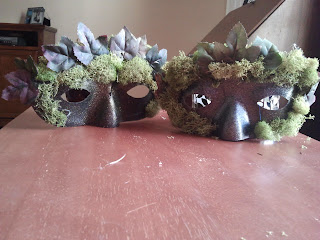
This first set of masks was for a couple, Michael and Marissa. Marissa wasn't into the whole feather thing and Michael wasn't going to be either so the idea of a mask resembling the green man was born. Because green is Andie's favorite color, these set are her favorite masks.
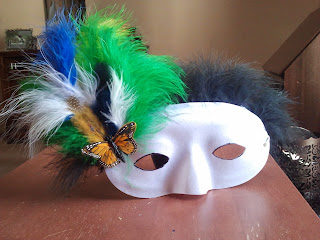
Feathers, butterflies and more- oh my!
Brandy's second favorite after Aunt Ruth's mask (see below).
Andie's second favorite. It has *everything* to do with the green butterfly!
Brandy's Aunt Ruth wore a dress adorned with red flowers. This mask was made special for Aunt Ruth and is Brandy's favorite of all the creations.

I've saved Brandy's least favorite for last. I am certain that the only reason this is the least favorite is because Brandy's mind saw something different because this mask is fabulous and rightly captures Brandy's love for the purple and her attraction for butterflies.
What do you think? Beautiful, yes? How about stunning, eh? Brandy's creativity constantly amazes me. She can take and idea, make it her own and produce some of the most lovely crafts. This rates right up there. Although Brandy doesn't always have time to post here on the blog, I usually make certain that she knows about and reads all your comments. Please join me in encouraging her to more creativity as the year closes. I can't wait to see what comes next!
Brandy (through Andie)
Subscribe to:
Posts (Atom)
