Background

Wednesday, April 18, 2018

A Last Set of Encouraging Notecards


For this last set of cards, I decided to try out a technique recently shared by Jennifer McGuire on her You Tube channel.  I used a similar technique - laying down oxide ink onto the background and then using the same ink and a background stamp to intensify the color.  I ended up stamping the background ink multiple times to ensure a solid stamp and difference in color.  Then I used a foam blending pad and my Ink Blending Tool to apply a very thin layer of Micro Glaze to the top of the paper.  This is the same product as the Distress Micro Glaze, just made by Judykins.  I stamped the sentiment using my Mama Elephant's Hello Friend Wishes stamp set to create a striking contrast before adding the Micro Glaze.

On the inside, simple, encouraging sentiments.


After my coworkers wrote their notes of encouragement, I selected an assortment of magazines, movies, books of games, a mug with Zen tea, an aroma therapy candle, a branded water bottle from our company, a soft pillow for head/back and the cards all tucked behind to be read at his leisure.

We delivered the basket of well wishes to him and expressed our wish for his speedy recovery.  I'm sure it warmed his heart and encouraged his soul, which was the point.

Tuesday, April 17, 2018

A Field of Poppies


These cards belong with the set of cards to encourage a coworker.  I also used my Prima Oil Pastels to stamp these images, but there is a little more technique with these since the stamp isn't a layering stamp.  I've lost the connection of this stamp with the manufacturer, but I think it is a Rubbernecker stamp from way back.  The black centers aren't a part of the stamp, but the oil pastels work well if you "dot" in the dark color to the center of the solid stamp.

I was super pleased with how these cards turned out - very watercolor in feel and look.


I'll be back with more cards later this week.  There were more than 50 cards sent to my coworker, so I've got quite a bit to share with you.  Thank you for sticking with me.

I'm entering this card into Simon Says Stamp's Monday challenge Doodle It since I doodled the frame around my poppies.


Monday, April 16, 2018

Blue Flower Notecards


More cards in the stack of those made for my co-worker.  Same techniques, just using a different Rubbernecker stamp, Blue Flowers.


Whew.  I hope you are still with me.  I've a bunch more to share and will do so in the coming days. 


Sunday, April 15, 2018

More Encouraging Notecards


I'm popping in today with these petunias stamped using my Prima Oil Pastel crayons and Rubbernecker Petunias stamp set.  These are more of the encouragement cards I made for my co-worker.


The yellow and slightly orange centers make such a bright and cheery card, I'm sure that they will be cherished and enjoyed.  Hurry back to work!

I'm entering this card into the Time Out Challenge:  #107: Spring because this is definitely a spring card and almost makes it as a one layer card (since my card front is one layer).

I'm also entering this card into the Word Art Wednesday's Weeks 330/331: Anything Goes


Friday, April 13, 2018

Celebrating With Balloons


Brandy went playing around with her Concord and 9th Birthday Stacks stamps and dies to create these two lovely cards.  The stamps provide this neat layering effect on the cards and the dies help to create the lovely layered, 3-D effect.  It is a quite lovely card and technique and the methods for using the stamps and dies can be found here


There are a few subtle differences in design, including the die cut sentiment on the second card.  I can't decide which I like best, but I know that the recipient of both are going to feel very special. 

Andie for 

Wednesday, April 11, 2018

Encouragement for a Soul


One of my co-workers was suddenly stricken with some health concerns which has caused him to be out of work for the last several weeks.  When I realized he would be out for an extended period of time, I decided we needed to send some bright greetings to him to let him know how very much we miss his contribution as well as to encourage his healing.  This is the first of several card sets that I made and will be sharing on the blog.  I've delayed these posts for a bit to allow him time to read through all the well wishes before anyone else might get to see them too!

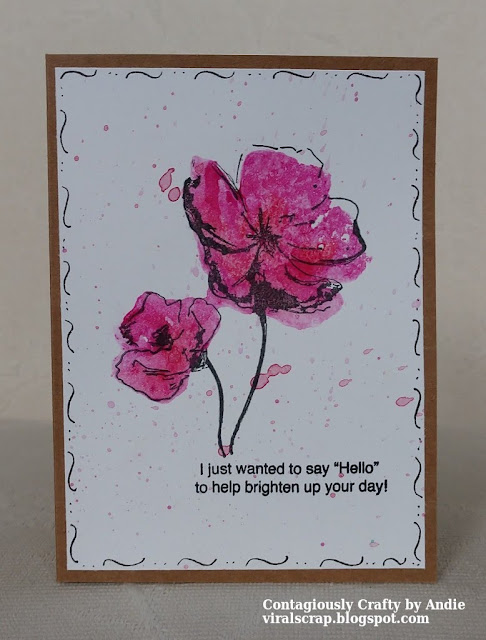
This set of cards was made with my Rubbernecker Poppy Duo stamps.  The stamp comes with the black outline stamp and the solid stamp to color the flower.  I decided to use a tried and true technique with my Prima Oil Pastels.


The frames around the flowers are hand-drawn.  This is a very "out there" technique for me, but I think it works here.  I decided to use an assortment of my encouragement sentiments, so each card says something different.  More cards to follow.

I'm linking this card up over at the City Crafter Challenge Week 407 CASe Ros for Happy Birthday Celebration  I CASed Ros' card and used the outline as my Inspiration. 


Monday, April 9, 2018

A Properly Wonderful Thank You


Two guesses who created this wonderful example of stamp masking?!  Yes, of course, this is Brandy's work.  She created this thank you card for me!  I was ever so delighted to be thanked in this way - green is my favorite color and this card is decidedly green, but in a way that makes the green both second and best! 

The stamping was done with Avery Elle's Windmill clear stamps and some masking.  I think you can tell from the picture - Brandy stamped the windmill's arms and fussy cut it out, adhering to the one layer stamped image with a brad.  Those arms turn, ladies and gentlemen!  The coloring was done with Copic markers and is so smooth and stunning in person, you can't imagine how beautiful this is. 


I've currently got this card on display in my front room where everyone who enters the house can see it displayed on it's paper easel.  It will stay there for a while as I simply adore this card!

Andie for 

Saturday, April 7, 2018

Another Notecard Set Using Supplies from the Stash


When I went "shopping" in the stash a few weeks ago I found these card panels that I had painted some time ago, but never put together in a card.  I had made similar cards (and here) previously when I stamped these panels and left them uncolored for some time.  Then, I watercolored the panels through a series of sittings - layering watercolor and never quite getting them "done" until I found them recently in the stash of partially finished cards.  I decided to use a more graphic feel for these two cards and my WPlus9 Hand Lettered Hello stamp and die set.


The beautiful sentiment is white heat embossed onto black paper and the blue card sentiment is more distinct in person - the picture doesn't do it justice.  Oh well, that is some more projects pushed to completion.  I'm liking this finishing of old project, but have more to share on other activities.  Will post those soon.

Thursday, April 5, 2018

Fun Handmade Trinkets - Spirit Charms


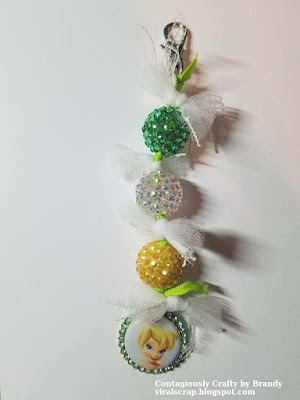
Brandy and I went to the Ribbon Store a few weeks ago and picket up some ribbons and beads and medallions to make these trinkets.  They have a key chain or clasp attached to one end and can be use as keychains, backpack pulls, etc. 


Brandy is going to use them as thank you gifts.  They reminded us of something a cheer/spirit squad would make. Of course, Brandy went crazy with the embellishments.  I super love the tulle additions !


My creations went to my daughter who is away at NAU.  She was a "bomb bird" on one of her softball teams as a kid and so we associate this Angry Bird with her.  The NAU is simply appropriate as her college school.  Pink being her favorite color, I simply had to get it in there somewhere.  I meant to have one of the gold beads on the NAU ring, but completely spaced it as I strung them.  The ribbon holding it all together is grosgrain and I stuffed it through the beads with a little ingenuity and some muscle.

Both Brandy and I had so much fun!  Easy to make and such a great finish, I'm sure everyone will feel special.

 and