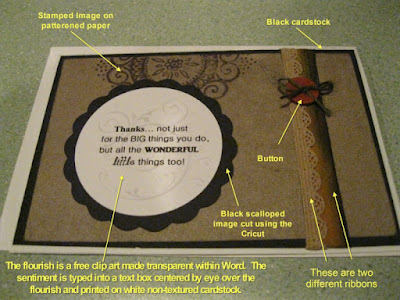
This card was created to give back to my boss on Boss's Day this year. It was a small, but hopefully meaningful way to say thank you for everything this past year.
Here's a quick diagram of the elements used:
The most unique of items on this card is the sentiment. I scraplifted the idea from a card in a magazine. The card had a birthday sentiment overlaying a light pink piece of birthday cake. I thought it would be a mature, elegant way to say thanks. So here's how I did it:
Step one:
Find a free clip art in a similar shape that you want to type. In my case, I was shooting for a circular image and found the flourish. I added the flourish image to my page:
Then I created a text box in a circular shape, typing my sentiment using several different fonts to create an interesting layout. I layed that text box over the image.
After this point, I needed to get the image to "fade" into the background. This is accomplished by selecting the image and then right clicking to reveal a menu item called "Format Picture". Under the Format Picture window that is opened, select the Picture tab. Modify the Brightness and Contrast settings until the image appears as you would like to print on your cardstock.
This image shows the actual circular text box used to create the sentiment. Both the text box and the image can be copied and printed onto an 8 1/2 x 11 piece of cardstock many times. Use a circle stencil, circle cutters or your Cricut (using the centerpoint function) to cut out the image and place on a scalloped embellishment.
Have fun, don't hesitate to try out making your own image/sentiment combinations!


No comments:
Post a Comment
Thank you so much for your kind words. Isn't it fun to encourage one another, even from a distance?